Imagine you’re all set for a day on the greens, but your trusty golf cart won’t charge. Frustrating, right? You’re not alone; this is a common hiccup for golf enthusiasts and cart owners. But don’t let it derail your plans!
Before you call in the pros or consider a hefty investment in a new cart, there’s a handful of troubleshooting steps you can take. You might just find a simple fix to get you back on course in no time. Let’s dive into what you can do to turn this around and ensure your golf cart is ready for action when you are.
Check the Power Source
When you’re dealing with a golf cart that won’t charge, it’s essential to start with the basics before you dive deeper. Ensure your power source is reliable and functioning properly. This step might seem too simple, but there’s no point in troubleshooting your cart’s battery if the power source itself is the culprit.
First off, check if the outlet you’re using is delivering power. You can verify this by plugging in another device, like your smartphone charger, to see if it works. If there’s no juice, the problem lies with your outlet or the circuit, and you’ll need to sort that out or find an alternative power source for your cart.
Next, look at the power cables and the charger itself. The wear and tear from regular use or the outdoor environment can sometimes damage these components. Inspect for any cuts, breaks, or burns on the cables that could prevent electricity from reaching your cart. Also, be sure that the charger’s plug and the cart’s charging port are both free from debris and corrosion. Sometimes a simple cleaning can restore the connection.
Lastly, if your cart uses an onboard charger, it’s critical to ensure that it’s seated correctly. An onboard charger that’s not correctly installed may not function as intended. If you’re unsure about how to check this, refer to your golf cart’s manual for guidance on proper installation or consider asking a professional.
If all seems in order with the power source, cables, and charger, but your cart still isn’t charging, it’s time to look further into your cart’s battery and electrical systems. Remember, regular maintenance is key to ensuring you won’t find yourself stranded on the course with a cart that won’t budge.
Inspect the Battery Connections
After you’ve verified the power source and charger are in good standing, it’s time to shift your attention to the battery connections of your golf cart. Remember, a secure and clean connection is critical for efficient charging.
First things first, safety is paramount. Make sure you’re wearing protective gear like gloves and safety glasses. Batteries contain acidic substances that can cause harm if not handled properly. Once you’re equipped, turn off the cart and open the battery compartment. Here’s what you should look for:


- Are the terminals free of corrosion? Corrosion can prevent a solid connection, hindering the flow of electricity. If there’s white, greenish, or any other powdery substance around the terminals, it needs to be addressed.
- Check if the connections are tight. Loose connections could be the culprit for your charging woes. All cables should be firmly attached to their respective terminals.
- Ensure no wires are frayed or damaged. Worn wires can disrupt the current and require immediate replacement.
To clean the terminals:
- Prepare a mixture of baking soda and water to neutralize the corrosion.
- Apply this with a brush, scrub lightly, and remove any buildup.
- Rinse with water and dry thoroughly before reconnecting.
While inspecting the connections, it’s also a good idea to test the battery voltage with a multimeter. Be sure your golf cart’s battery matches the required specifications for voltage and amperage. It’s not uncommon for golfers to overlook this aspect, but it’s a significant step in pinpointing charging issues.
In case the battery is old or the cells are damaged, you may need to consider replacement. Deep-cycle batteries typically last around 4-6 years depending on usage and maintenance, so keep track of your battery’s lifespan.
Remember, maintaining your golf cart in top condition is akin to keeping your clubs well-groomed. It’s all about ensuring that every element is ready to perform when you need it most, letting you focus on your game without unwelcome surprises.
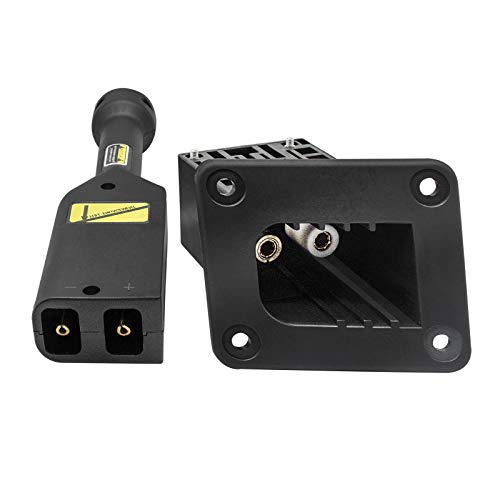
Check the Charger
When you’re trying to diagnose why your golf cart won’t charge, don’t overlook the charger itself. It’s the workhorse that ensures your cart’s ready to go, but just like any other piece of equipment, it can run into issues.


First, inspect the physical condition of the charger. Look for any signs of damage or wear, like frayed cords or cracked casings. If the charger appears damaged, it could be the culprit behind your charging woes. In cases like these, you might need to replace the charger or have it repaired by a professional to get back on the greens without delay.
Next, ensure that the charger is properly seated in the charging port of your cart. Sometimes, a charger won’t function simply because it’s not making a good connection. A charger that’s even slightly askew could interrupt the power flow needed to charge the battery. So give it a firm push to make sure it’s fully connected.
Another key aspect to consider is whether the charger’s electrical output matches your golf cart’s requirements. Every cart has its own specific needs, and if your charger isn’t compatible, it won’t properly charge the battery. Check the manual or look up your golf cart’s model online to find the correct specifications.
If the charger seems fine at a glance, the next step is to ensure it’s functioning correctly. You can do this by testing it with a voltmeter. A working charger should display a voltage reading that’s slightly higher than the battery pack’s total voltage. For example:
| Battery Pack Voltage | Expected Charger Voltage |
|---|---|
| 36 volts | More than 36 volts |
| 48 volts | More than 48 volts |
If the voltages don’t match up to these expectations, the problem may lie within the charger. Without the right output, it’s like trying to play a par 5 with a putter—just not going to get the job done.

« Top 2 Follow-You Electric Golf Carts: Which Brand Leads the Fairway?
Golfers Rejoice! How the Golfclubs4cash Warranty Transforms Your Game Worry-Free »
Remember, a fully functional charger is essential for your cart’s performance and longevity. Keep an eye on your charger’s condition and operation, and you’ll ensure that you’re always ready to play your best round with a cart that’s charged and rearing to go.
Test the Battery Voltage
If you’ve been playing the game for a while, you know your golf cart is as crucial to your game as a well-kept set of clubs. Without a reliable ride, those long treks from hole to hole will wear you out faster than a double-bogey. Now, when you’re stuck with a cart that won’t charge, it’s time to dive deeper, and testing the battery voltage is your next move.
Grab your multimeter—it’s not just for the tech-savvy. Testing your golf cart’s battery voltage is straightforward. Start by setting the multimeter to the proper voltage scale that corresponds with your cart’s battery total voltage. Place the device’s leads on the positive and negative terminals of the battery. No reading or a reading that’s significantly lower than the expected voltage indicates a charging problem.
If you’ve got a fleet of batteries powering your cart, test each one individually. Golf cart batteries should typically measure around:
| Voltage Type | Standard Voltage |
|---|---|
| 6 Volt Battery | 6.3 – 6.4 Volts |
| 8 Volt Battery | 8.4 – 8.5 Volts |
A discrepancy in these numbers can point to a faulty battery. Remember that consistency across all batteries is key for optimal performance. So if one’s not making the cut, it’s dragging the rest down with it.

Lastly, don’t dismiss the importance of the water level in your batteries. Low water levels can lead to improper charging and reduced battery life. Before any voltage check, make sure the water level is adequate, typically just above the plates. Use distilled water when topping up to avoid any mineral buildup.
Armed with a multimeter and this know-how, you’ll keep the rhythm of your game humming smoothly. Your cart’s reliability isn’t just about comfort; it’s about keeping your focus where it belongs—on the game.
Consider a Battery Replacement
Sometimes, despite all your efforts with regular maintenance, batteries give out. Age or deep cycles of discharge can take a toll on a golf cart’s batteries. If your batteries are older than five or six years, it might be time to consider a battery replacement. This is especially true if you’ve already tried troubleshooting steps, like ensuring the batteries are properly charged and maintained.
Batteries are the powerhouse of your golf cart; they’re essentially what keeps you moving on the course. When replacing them, here’s what you need to bear in mind:
- Voltage and Capacity: Ensure you match the voltage and capacity to your golf cart’s requirements. Mismatched batteries won’t just underperform – they could cause damage.
- Quality: Invest in high-quality batteries. They might be more expensive upfront, but they can save you money and frustration in the long run. Cheaper batteries might not hold a charge as long and could lead you to more frequent replacements.
- Correct Installation: Faulty installation can lead to poor performance and even cause safety issues. If you’re not experienced with the installation process, seeking professional help is a smart move.
It’s important to note, golf cart batteries are not one-size-fits-all. Battery types vary from flooded lead-acid to absorbed glass mat (AGM) and gel types, each with their advantages. Picking the right type for your golf cart and usage patterns makes a significant difference in performance.

Regular battery replacements are just as crucial for an electric cart’s longevity as regular maintenance on a gas-powered cart. Recognizing when your game is being compromised by battery issues is key. Proper battery upkeep can make sure you’re focusing on your swing rather than why your cart isn’t functioning at its peak.
