You’ve just hit a beautiful approach shot and as your ball gracefully lands on the green, it leaves behind a small reminder of its journey—a divot. While it might feel like a mark of pride, those little indentations can wreak havoc on the putting surface. That’s where you come in, ready to fix the green and keep the game rolling smoothly for everyone.
Repairing ball marks is not just a courtesy; it’s a responsibility that ensures the health and playability of the greens. Don’t worry if you’re not sure how to properly fix a divot—you’re about to learn the simple yet effective way to do it. With a few easy steps, you’ll be repairing those greens like a pro and helping to preserve the course’s beauty and challenge.
Why Repairing Golf Ball Divots is Important
When you’re out on the green, striving to shave strokes off your score, you might not always think about the small actions that can have a big impact on the game. Repairing golf ball divots is one of those critical, often overlooked aspects of golf etiquette that affects everyone. It’s not merely about courtesy; it’s about preserving the quality of the playing surface for your follow golfers and the future rounds you’ll play.
Imagine lining up a crucial putt only to find your ball’s path diverted by an unrepaired divot. It’s not just frustrating; it can truly make the difference between a par or a bogey. Over time, an unrepaired divot can cause the grass to die, leading to more extensive damage to the green. In contrast, a repaired divot can heal within 24 hours, keeping the green in pristine playing condition.
Here are some reasons why fixing divots is essential:
- Smooth Roll: A well-maintained green helps ensure your ball rolls smoothly towards the cup.
- Fair Play: Part of the challenge of golf is playing the course as it is intended. Unfair surface disruptions can skew the game.
- Course Beauty: A golf course is like a canvas, and your role is to help maintain its beauty. Pristine greens are a source of pride for any establishment.
- Longevity: The more diligently divots are repaired, the longer the greens maintain their quality, saving on repair costs and preserving the course’s character.
Adopting good divot-repairing habits doesn’t just reflect well on you—it contributes to the ongoing health and playability of the course. Next time you’re about make that winning putt, take a moment to scan the vicinity for any ball marks. Repairing them is a nod to the unwritten rule of golf: leave the course better than you found it, and it’ll do the same for you by presenting the best possible conditions for achieving your best score.
The Essential Tools for Fixing Golf Ball Divots
When you’re out on the greens, happily knocking the ball from hole to hole, it’s vital you have the right tools in your arsenal to patch up any divots you leave behind. Good divot repair tools are as essential as the clubs in your bag if you’re serious about respecting the game and the course.
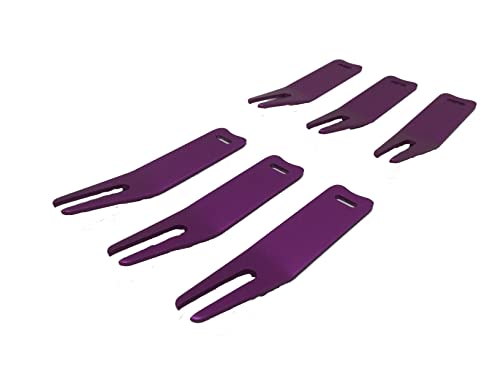
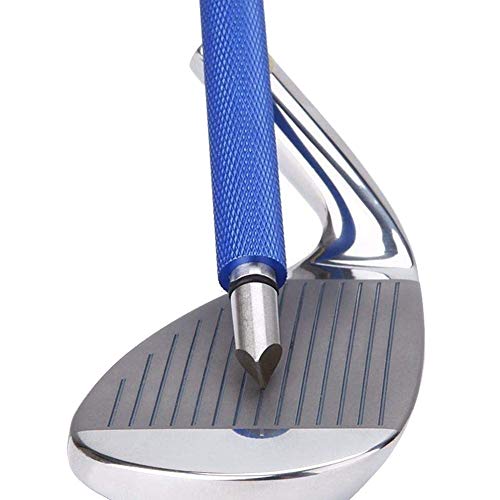
First, you’ll need a divot repair tool, often given out at courses or available in pro shops. These are small, fork-like tools that make it easy to fix a ball mark. You insert the prongs at the edges of the divot and gently push the turf towards the center. It’s a straightforward tool that does a big job in keeping those greens in prime condition.
Another must-have item is a ball marker. It’s necessary to mark your ball’s position before you start repairing a divot so that you maintain fair play. Ball markers come in various sizes and styles, from simple flat disks to more personalized magnetic ones that you can attach to your divot tool or glove.
Here’s a quick reference for what you should carry:
- Divot repair tool
- Ball marker
- A small towel to wipe down wet or dirty golf balls and tools
Remember, while selecting a divot repair tool, it should feel comfortable in your hand and be sturdy enough to handle the task without doing additional damage to the green. Some divots require a bit more finesse, so having a tool that fits your grip will make it easier to perform this essential courtesy.
By keeping these key items on hand, you not only show respect for fellow golfers but also contribute to the longevity and beauty of the course. With the right tools and a little practice, you can quickly become proficient at this unsung aspect of golf etiquette. And who knows, working on the smaller details of the game just might help you shave off those few extra strokes for your best score yet.
Step-by-Step Guide to Repairing Golf Ball Divots
You’ve got your divot repair tool in hand and you’re eyeing a fresh ball mark on the green. Here’s how to fix it the right way to keep the playing surface pristine:
- First, insert the divot tool at the edges of the depression. Aim it outside of the divot rather than in the center.
- Gently push the edge of the tool towards the center. Be careful not to lift the soil up as that can damage the roots.
- Work your way around the divot in a clockwise or counterclockwise direction. The goal is to gradually close up the gap, not to terrify the grass with rough handling.
Once the gap is nearly closed, lightly tamp down the repaired spot with your putter or foot. This final touch is like smoothing out the icing on a cake, making it look good as new. It’s not just about aesthetics though; tamping encourages proper root reconnection and helps the grass heal quicker.


Having the right technique can make a world of difference:
- Don’t twist the divot tool excessively — this can tear grass roots and prolong recovery.
- If soil is missing, fill in the divot with a mix of seed and soil provided by most courses.
Remember, every putt counts and playing on a smooth green can lead to more sunk putts and lower scores on your card. Your attention to detail could even impress your playing partners, setting a standard for course care that everyone appreciates. So, the next time you step up to a ball mark, think of it as an opportunity to maintain the quality of your green and improve the game for everyone who follows.
Best Practices for Fixing Golf Ball Divots on Putting Greens
You know the feeling when your precisely targeted putt is thrown off course by an unruly divot. It’s frustrating, isn’t it? But with just a little know-how, you can ensure that others don’t suffer the same fate on the putting green.
Choosing the Right Tool is crucial. A simple divot repair tool, which usually has two prongs, is what you need. Some golfers prefer a tee or a knife, but a specialized tool does the job best, carefully lifting and pressing the turf without causing further damage. Remember, the tool should feel comfortable in your hand as you’ll be using it often.
When you approach a divot, insert the tool at the edges, not the center of the depression. Gently work the tool back and forth to bring the edges of the divot closer together. The idea is to push the grass at the edge towards the center without aggressively lifting the turf and damaging the roots.

« Ever Wondered How Many Golf Balls Fit in a Sleeve? Find Out Now
Slash Your Golf Expenses: Uncover How to Save Big on Golf Balls »
Here’s the part where technique really comes into play. Twisting your divot tool can actually harm the grass, so avoid that common mistake. Instead, push the turf inwards and tamp down lightly. The goal is to create an even surface, but also to be gentle enough to allow the roots to heal and the grass to regrow swiftly.
After you’ve neatly closed the gap, gently tamp down the repaired spot with your putter or foot to make sure it’s smooth. It should be almost as if the divot never happened.
Remember, the putting green is where games are won and lost. Keeping it in top-notch condition with meticulous divot repairs isn’t just about courtesy; it’s about respect for the game, the course, and fellow golfers. Plus, your actions set an example for new golfers learning the ropes. So take pride in repairing those divots; it’s a testament to your love for the game and commitment to preserving it for future generations.
How to Prevent Golf Ball Divots on Putting Greens
Playing on a pristine putting green is one of the joys of golf, and you’ve got the power to keep it that way. Preventing divots is as much about technique as it is about the care you take with your approach.
Choose your equipment wisely. Using a high-loft club for approach shots minimizes the chance of taking a big divot. The steeper the descent, the less likely your ball will gouge the green. And remember, it’s not just about the club; it’s also how you use it. Focus on a clean strike where the clubface meets the ball first, not the turf.

Your approach angle also plays a critical role. Pay attention to that angle you’re creating with your swing—coming in too steep will certainly leave a mark. Work on a shallower path in your downswing to help your ball land softer. This doesn’t just keep the greens in good shape; it actually improves your control and spin, giving you a better chance at a close pin position.
It’s all about practice. Spend time working on shots from 100 yards and in. The goal here is to develop a touch for those finesse shots that land gently. Think of it as trying to land a plane smoothly—the same goes for your golf ball.
While practicing, pay extra attention to the condition of the green. Are you playing in the morning dew or the midday sun? Moisture in the grass can affect how your ball reacts. Adjust your club choice and strike accordingly.
Finally, walk mindful of the greens. Foot traffic can impact the surface just as much as ball marks. Tread lightly and steer clear of putting lines. Not only is this considerate to fellow players, but it also helps maintain the green for the game you love so much.
Remember, preserving the beauty of the course is a shared responsibility. As a low handicap golfer, you’ve learned these nuances over countless rounds. With these strategies, you’re enhancing the experience not just for yourself, but for every golfer who follows—because everyone deserves to enjoy a well-kept green.

